Friday, April 19, 2019

LITTLE VICTORIES

My one reader knows that I only post when I have something which deserves a post, and that I don't like to post only the beginning of a project. So it has been, on occasion, that I don't post for a while. That's also why I only have one part-time reader.

But occasionally I have a lot of small things to get done in a short amount of time; such is this post.
And though the big projects feel great to complete (or, as in the case of The Standish Farm, that PHASE of a project was completed), it's very nice to do a whirlwind of small wrap-ups and to make things ready for the next stage.


It has not stopped raining in southern Connecticut since last August. It's late April now. Sure, we had freezing rain and snow in the winter months, but there was rain every third day if there wasn't snow. Mold grew on everything last year, including my gas cans, and the past month gave us the only consecutive six-day period without rain since last August. We had two of these, and if you've been reading, you saw I took advantage to finish the 1860 barn structure and roof.
I knew it wouldn't last. It IS April, after all. So with a week of rain predicted with virtually no break, I figured I'd better get a lot of small victories under my belt before the entire farm sinks into the wet ground.


First job; get the ridge of the new roof dried in. The rear of the barn roof still has its eight layers of asphalt shingles as well as the cedar shakes and ancient roofers. These will be removed in time, but they aren't leaking now so they stay. The small gap between this and the new roof was still open, so I screwed in a few toeboards and ran a narrow layer of ice-shield (roofing underlayment) over the ridge. Screwed some thin wood down to keep it there. That will make it dried in enough for a month so I can frame in the walls, set windows, and wait for the steel roof, which will arrive in two weeks. At that time I'll need to come up with another ridge dry-in method, prolly one of metal.


A closer view. Rain started spattering as I finished.


The small amount of heart pine board-and-batten I installed to impress the appraiser never did get waterproofing, so I sanded the surface and brushed on a 1:1 mixture of oil-based clear finish and paint thinner. I used this on the garage doors and it penetrates and causes water to bead up without any glossy finish. Perty, too.
The gutter above is even more protective.


I visited my soon-to-emerge plants and trees. This is what the climbing nightshade looks like in winter. I call it Cousin It. Don't touch it, you'll get sick. Deadly poison.


The Redbud that finally grew some last year. Hope it continues. I need the shade in the shop. Maybe by 2045.


I spent a number of years getting rid of the Chinese wineberry plants, which grow like triffids around here. Great berries, taste like red raspberries, but a nuisance weed. This one I'll leave where it sprouted. I think I'll ties the canes to the fence.


Cool day, Dad's in the yard and visible. Time to play!


Speckle may be young, but Marley can hold her ground.


Snarly McSnarlface. It's all good fun.


Lookit my butt! Lookit my butt!


Time to race around the yard after wrestling and snarfling.
Dogs lead a busy life. Sleep for most of the day, eat, shit and play for the remainder.


My tiny redbud, which also grew more last year than any other. It's fertilizing time.


Volunteer nightshade. I'm leaving it.


Hard-to-see volunteer rock pear. This one grows where the yellowjacket nest was. It's going to be encouraged, and is in full bud. Hard to see, I know.


The next phase of the 1860 barn is framing the side walls, placing windows, and sheathing with plywood. I gathered every piece of plywood I had on the property and brought it to the barn. Some larger, some smaller, some 3/4", some 1/2". It'll all come in handy.


Even have three Zip-sheets.
A lot of 3/4" ply behind the tarps. It's to be used for the rest of the barn flooring, a late spring project.


Some narrow sheets. All will be reused. It's what I do.


The shop sheathing with applied finish.
Makes me want to finish the side. But I need dry conditions for that. Soon. I hope.


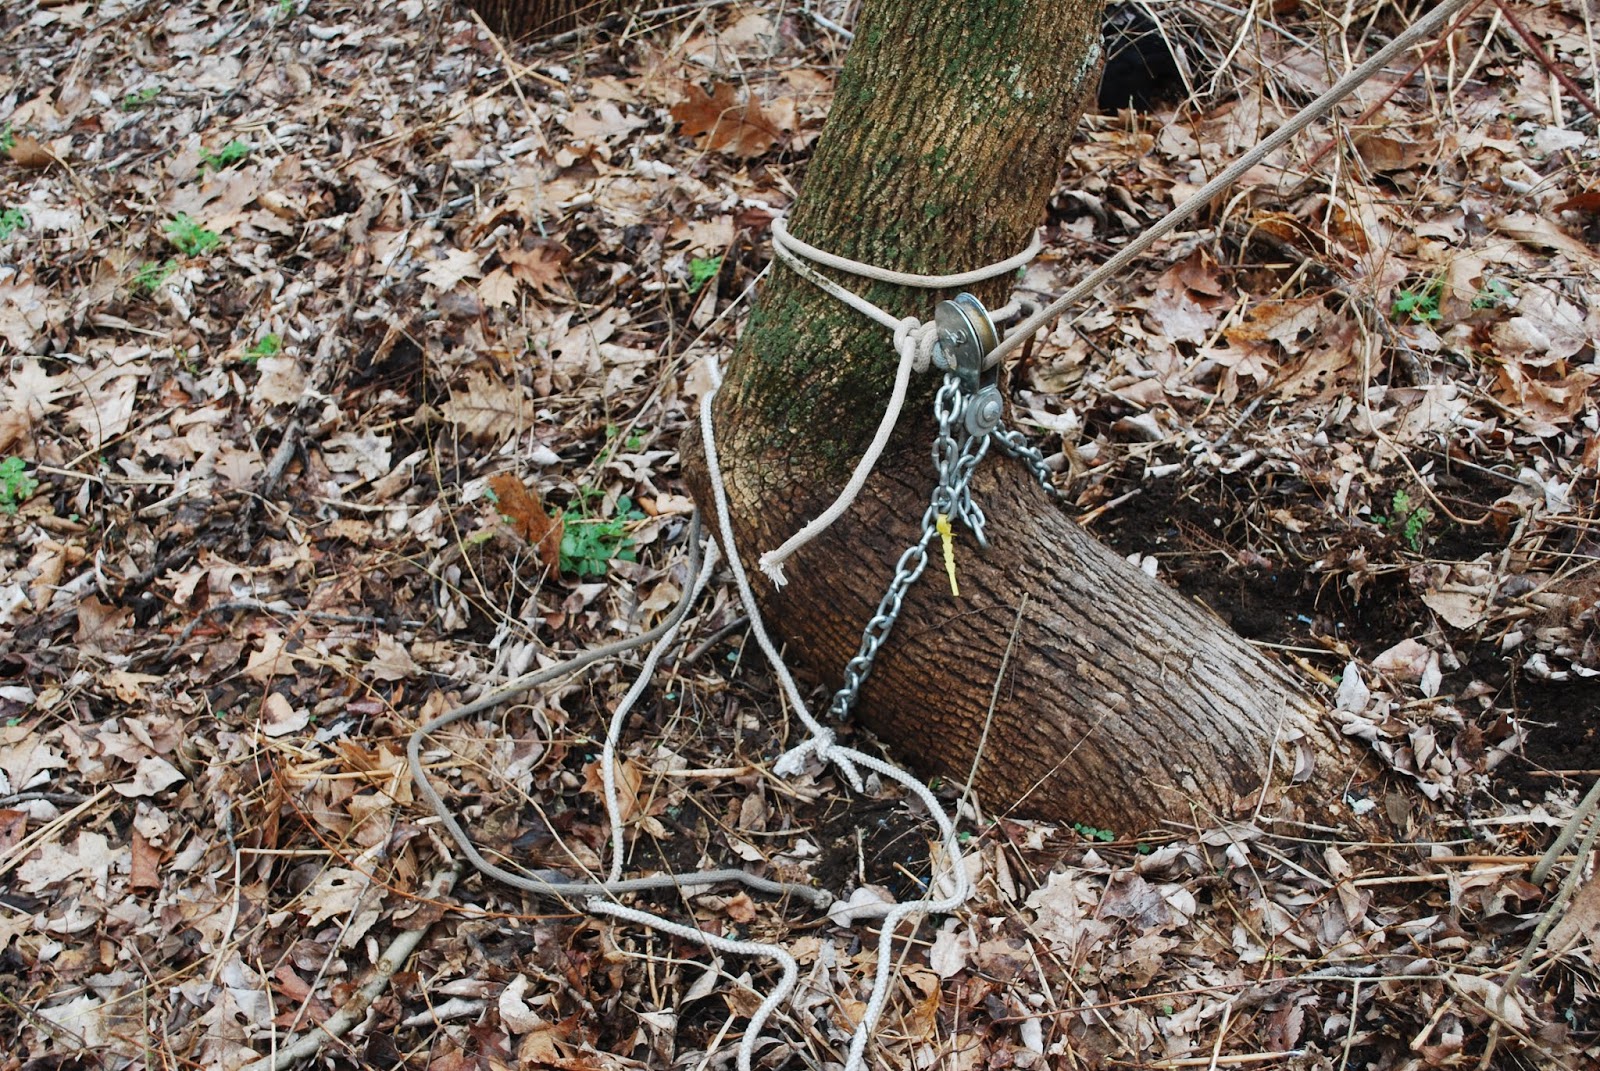
The big split in the apple tree had been there for years, but when I cut the top branches last week, I saw that there was some deterioration on the top level of the split and water was gathering inside. I said I'd be supporting the huge branch, but I really needed to keep the water out of this split. So I put on a big band-aid made from ice shield and small nailers screwed into the trunk.


Put one on the hole to the left as well. I'll be posting more on the protections I devise for this tree as soon as the rain slows a bit.


Not pretty, but keeps the water out.


I'd already dug some square holes, inserted threaded rods, and filled them with concrete. These would support the frame that would in turn, support the branch with the split.


Piers with accompanying 4x4 ends that screw to the threaded rods.


Cleaned out another section of the Now Dried In barn and stacked the plywood there.


Should be enough.


Miscellaneous cripples and posts along with jigs in a pile.


Gathered all the newer 2x4s and stacked them in the loft. Will start framing this weekend or early next week, if the wind isn't blowing in.


After having two wonderful burn days (no wind, wet ground, and wood dry enough to start the burn), I was left with this one pile. Near it I piled a lot of old furniture and other wood I can't use. Never make the fire too big; keep it small and constantly add to it. Note the hose and cleared area around the fire pile. I don't take chances with fire.
Now all I need is a windless morning (haven't had one in two weeks) and a day without rain.
July, maybe. Sheesh.


Despite the small victories, there are always setbacks. Needing to fill my constantly-leaking pneumatic wheelbarrow and hand truck tires, I found that alien invaders compromised my air compressor, the red one on the right. Good timing; rain approaching and six bags of concrete in the back of the van. Couldn't drive them down to the apple tree, too soft from (guess) rain.
I'd left the compressor in the loft since Aril 7th when I completed the roof decking, and when I turned it on...nothing. Tested the wires and switch, traced it to the motor. Took an hour just to figure out how to expose the motor (in the black plastic housing on top of the red tank). The space around the motor was filled with polypropylene or whatever the mice took from old cushions to make their very cozy nest. And having nothing better to, being mice, they ate, shit, probably fucked a lot, and chewed through all the small wire so difficult to reach without total disassembly. Once I had it all apart, I removed their bedding, patched all the wires, and still had one end I assumed went into a socket I found. Put it all back together.
Still didn't work. The wire went somewhere else.
Damn.
So I spent thirty bucks on a battery-powered air compressor for filling my damn tires (the chartreuse thing). Should have got one of these along time ago; much easier than hauling around the compressor, hoses, extension cords, and finding the damned air chuck that's always missing. And I have five batteries for this brand.
But what would I use for my nail guns?


Solution.
I'd had that compressor for twenty-three years and I'm sure I can get it to work when I'm not so rain-threatened. It'll be nice to have one in the shop and another in the barn.
Ninety nine bucks. Happy my credit is good.
I've a promise of a job, but if they keep the promise, it wont start until May 1st. We'll see.


Monday, April 15, 2019

THE APPLE TREE 1


 This is the apple tree before trimming the upper trunks. The broken tree on the right is a distant wild cherry, and as the cambium (the life-giving veins of the tree that makes up the inner bark) of the cherry is still intact, the broken trunk still produces new branches, so I haven't cut it at the break. Not only that, it also produces the only harvestable wild cherries on the property, as all my other cherry trees are too tall to reach. Wild cherries are tiny and extremely tart but make great wine. I could possibly get enough from this tree to make a glassful!
Back to the Apple.

The Apple Tree has only produced apples once; in 2015, after the harshest winter seen in decades. But then, every apple tree in the state went crazy that year.
Two years ago, there were no apples in Connecticut; a late freeze killed all the flowers in April.
As can be seen here, the apple tree at Standish Farm hasn't been trimmed in a very, very long time. That makes it unlikely to produce apples. All top growth and no trimming equals no apples.
Sure, I'd get one or two gnarled little goiters that fall off the tree before growing no more than two inches across, but that's about it.
So I studied about old apple trees, and found that they need to be kept close to the ground, and not allowed to grow high. This one was more than twice the height it should have been.
Five yers ago I realized this, saying "As soon as I have the refinanace done, I'm going to rent a man-lift and top that tree!"
It's been here for over two hundred years. And it is twisted, convoluted, and pocked with thousands of sapsucker holes. But it lives on.
So the refi is done, I'm unemployed, and spring is here. Apples like this need topping in early April or late March.
It wa time.
But I had no man-lift. I had no money.
Ah, but I gots a brai-un.
So I went out to look at it from many different angles. And I figured out how to do it.
I just needed to make sure doing it didn't kill me.


Two huge branches were actually extensions of the trunk, and had been going vertical for some time, probably since the early 20th century. The biggest one, shown here, was my chosen subject.
One must not cut too much from an old apple tree; one-third the height of the entire tree in a single cutting is the recommended amount. It can be repeated the next year.
There was another branch that stretched to the sky and leaned a bit east, but could I do that as well?
Oh, hell, this one would probably kill me...


Not much of a pic on such a cloudy day, but keep reading as I expound on the cut.
Having no man-lift, I knew that climbing a ladder in such an unstable place would be unsafe, and doing so with my twenty-inch Stihl Chain Saw was...unwise. What was a poor adventurer to do?
Develop a plan, of course, using what he's got!
And I had a lot of guts, ingenuity, ladders, and an electric  pole saw with an 8-inch chain bar; the pole extended almost nine feet.
I had me a play-un!
So I set a ladder in a safe, flat place and began to cut. I cut a little at a time and watched the Big Branch. I had to make sure it didn't HINGE and swing down to knock me off the ladder. That wouldn't be good. So I cut, then shook the tree, then cut and shook the tree.
Shakin' the tree here, Boss!


This split branch was my perch, or at least upon that which I rested my ladder. The right-tilting branch in the center of the pic would be my next victim. More on the split branch as we go along.


The Split Branch is how you want your apple tree to grow; horizontal or on an angle. The fruit will weigh down the branch, and can be gathered easily. Upright branches rob the tree of nutrients that are better for lower branches. This branch would need extra support. I knew this in 2012 when I first saw the tree, and I knew it would need it this year or I'd lose it. And that it would need it RIGHT soon, as it would soon be laden with heavy leaves that would make it sway in the wind.
More on that later.


As I set the ladders, I could only look at the Giant Trash Pile in the 18th century animal pens and growl. "Maybe next year I can get a front end loader and a dumpster to remove this blight..."
But I say that every year. I never have the money, and my bank account this year was the thinnest so far.
So I'd do as I've done for five years; let the Giant Briar grow over the Izbicki Trash Mountain and hope for better times next year.


Setting up the ladder


My chosen weapons of Branch Removal.
Extendable pole saw, a child's compound bow, a sumac branch, and.....
a roll of nylon twine?
What could I possibly do with these?


I continued to cut on the upward trunk. A little at a time, watching the trunk all the while...
Cut cut cut, climb down, shake the tree...
Shakin' it boss!


It wasn't just a branch, it was HALF the tree! Well, a third, anyway. Rope is in place. How did it get there?
Lemme 'splain..


Now, people, I ain't stupid. I did this for three days and knew the tree was perty orn'rey. It WANTED to kill me. So I bought a little insurance with the only money I had.
My Brain Trust.
If I tied a good, thick rope to the branch, er, trunk, and applied pressure, it COULDN'T  turn on a hinge to kill me!
Thus the bow, sumac branch (I have no arrows) and the yellow twine.
Are yew beginnin' to git it naow?
Okay, I'll splain it to you further.
I trimmed the small branches around the point I wanted to put my rope and shot a sumac branch through the gap and over an upper section of the trunk I wanted to remove. I couldn't reach it, had no arrow, but I did have the tiny compound bow. So I MADE an arrow from a very light and straight sumac sapling and tied the mason's twine to it, leaving an extra long section loose. Then I played Robin Hood and tried to shoot the branch through the gap and over the trunk. The first two attempts were failures, but the last worked. I untied the sumac branch/arrow and tied the nylon twine to a long rope, which I pulled over the trunk, tied a bowline in the end (a loop, threaded it with itself), and pulled it tight. Putting it through the pulley chained to the angled tree trunk nearby, I had enough pressure on the trunk to make sure it wouldn't suddenly crack while I sawed, swinging back down on me, knocking me off the ladder and ruining my day.


The cut is just below the intersection of the hemlock in the background and the trunk in the center of the pic.

The rope pulled tight, I again ascended the ladder and continued to cut. I did this several times, each time I descended, I yanked on the rope to test the cut so as not to have it come down catastrophically. Eventually I cut enough so that when I pulled on the rope, I heard it crack. I then began a pull-hard-and-let-it-go-and-repeat system, swinging and swaying. It began to crack, then crack more, and eventually...


It came down perfectly, not only missing my ladder (I was on the other side of the tree almost forty feet away), but missing all the lower branches I wanted to save. It worked as just as I had planned.


Not a real clean cut, but it can be sculpted. I considered taking the rest down (I should remove about ten more feet), but one third is as much as is recommended to be removed in one year. Besides, I realized I could use this trunk to help support the cracked branch below, which will be my next big task. It should be done before the tree leafs out fully. More on that in a later post.


St. George slays the dragon!


This is on the second day, as the Masters had begun and I had to go inside after slaying the dragon the day before. I set up the extension ladder on a branch of the tree and went to work on the other big branch. It looks like I'm going to saw the branch the ladder is on, but I'm actually cutting almost eight feet away, and the ladder is quite stable, laying flat on one branch while leaning slightly on an upward branch. The branch I wanted to cut was not as thick as the big trunk I'd already cut, but it was directly above all the branches I wanted to save. Apple branches are very supple and will bend a LOT before breaking, but I didn't want to harm them at all, as they were loaded with new buds ready to flower.
I must admit that this whole thing might be an exercise in futility; this tree has only once given me apples in five years. But I have never sprayed it or trimmed it properly, and it may take a few years, but I'll get a crop eventually. But not if I don't cut these branches.
So for this situation, I cut each branch individually so as not to harm the branches below.
Especially the crooked one closest to the ground.


It took a while, and only once did my saw bar get pinched. I left it dangling, and growling at my stupidity, went and got a sixteen-foot 1x, with which I pushed on the branch until it let go the pole saw, which dropped to the ground and impaled itself, spear-like, blade deep in the soft ground. I pulled it out, wiped it off, and went back to work.


The final result. The trunk will remain this way until next year, when I'll reduce it by another ten feet. In the meantime, I have other work to do to save this ancient tree. More on that in another post. It'll be soon; I'm racing the clock.

Monday, April 8, 2019

ROOF DECKING


After all the work I did to get the barn supports augmented, build the second floor and staircase, dig out the dirt and rocks, remove the milking floor, rebuild the girts with scarf joints, and put the rafters up, the decking seems both anticlimactic and ultra-modern. It is the latter but not the former. It only took four hours to install, and I was not surprised that very little lined up as in new construction, but it was very satisfying and I'm going to take a few days off from the thing. As to the not lining up, I knew this was likely and the doubled-up rafters took care of that. The original rafters were just a tad off their supposed twenty-four inch centers. They say they don't build 'em like they used to. I have news for you. They NEVER built 'em like they used to.
Left over from the house roof, the Zip-System decking has an annealed coating of plastic and the tape seals the joints tight. I'll be putting the 5-V metal on in the next week or so, but now I gotta rest.