THE LIVING ROOM PART LAST
It's been a long time coming. I moved into this place in late October 2013 with no electricity, no water, and no idea what I was getting into. I've been camping in this construction site of a house, battling the bugs and rot, garbage and killer flora. I've been buried in snow, frozen more times than I want to think about, and this year has been a bitch. I was sick from January through April, then again from August until October. I've lost a lot weight and a lot of very valuable time on this project this year, and the two things I cannot afford to lose is time and money, because I have very little of either. The weight isn't something I can spare much of anymore, either.
But work has been constant for a steady income (small though it is), my puppies are a constant source of companionship and entertainment, and my neighbors are top-notch. The weather has been good since the snow melted in April, and whatever spirits live here seem to like me. So there's that.
I have a wonderful woman in my life, another old-house crazy named Sher, and why she puts up with me, I will never know. But she's been a rock through this process. Patient and ass-kicking at the same time.
So.
The brush cutting from the previous post was tough, bruising, and lasted from late April until mid-June, when the temps hit the upper eighties. I abandoned the land for the living room project, even though my barn work did not hold through the winter. The record snows were just too much for my late season repairs, and the next post will show what I've done in the past few weeks to the barn as well as the amazing result of a ton of brush cutting. But that's next time.
I created and developed, then recruited and put together The First Annual Preston Music Festival in August, and it nearly killed me. I suffered from the most profound exhaustion at the end of the show, and successful as it was, I could only drag myself to work for the next few weeks.
How successful was it? Well, the Preston Historical Society, for which this was a benefit, made six hundred bucks. Wow, Katy bar the freakin' door. But my closing act was a young kid with crazily curly hair that could sing and play like no one I'd seen in a while. His name is Braiden Sunshine, and he has since made a name for himself on the show "The Voice." I knew he'd go somewhere, and he's going to go even farther.
Anyway, I suffered some serious exhaustion after that, then September was in the nineties up here, and I had to work in the heat. Heat exhaustion this time. Lasted until late October. I was a wreck, and the work at Standish Farm suffered.
I said I hoped to be in the living room by The Masters (early April), then joked I'd be more likely to get moved into it by The World Series. Well, the best laid plans of mice and men gang oft agley, but I don't listen to Scottish poets. Old Burnsey was right about this one, though.
I did eventually get into the living room, though later than I'd expected. It is the one room in the house that is pretty much complete. And I can't wait until it's cold enough to spend some time decorating it properly. That will be for the first week of January, when we expect the REAL cold to start. We're having a very warm December, and unless you live in Montana, you are, too. Hell, I have DANDELIONS growing in my front yard. It's a week before Christmas, for Mesakes.
So here's how it went down, the finishing of the living room. If you haven't seen the last couple of posts to see the demo work, go back and read them. I'll wait.
Dum dee dumm dee dum...
You finally done? Jesus, you read slow.
Here goes.
I began to get the ceiling joists cut and ready in late July, but I didn't get the damn room ready until just after Halloween.
Just missed being able to see the World Series in it, though I saw some of the last game there. My Royals rocked!
Let's go.

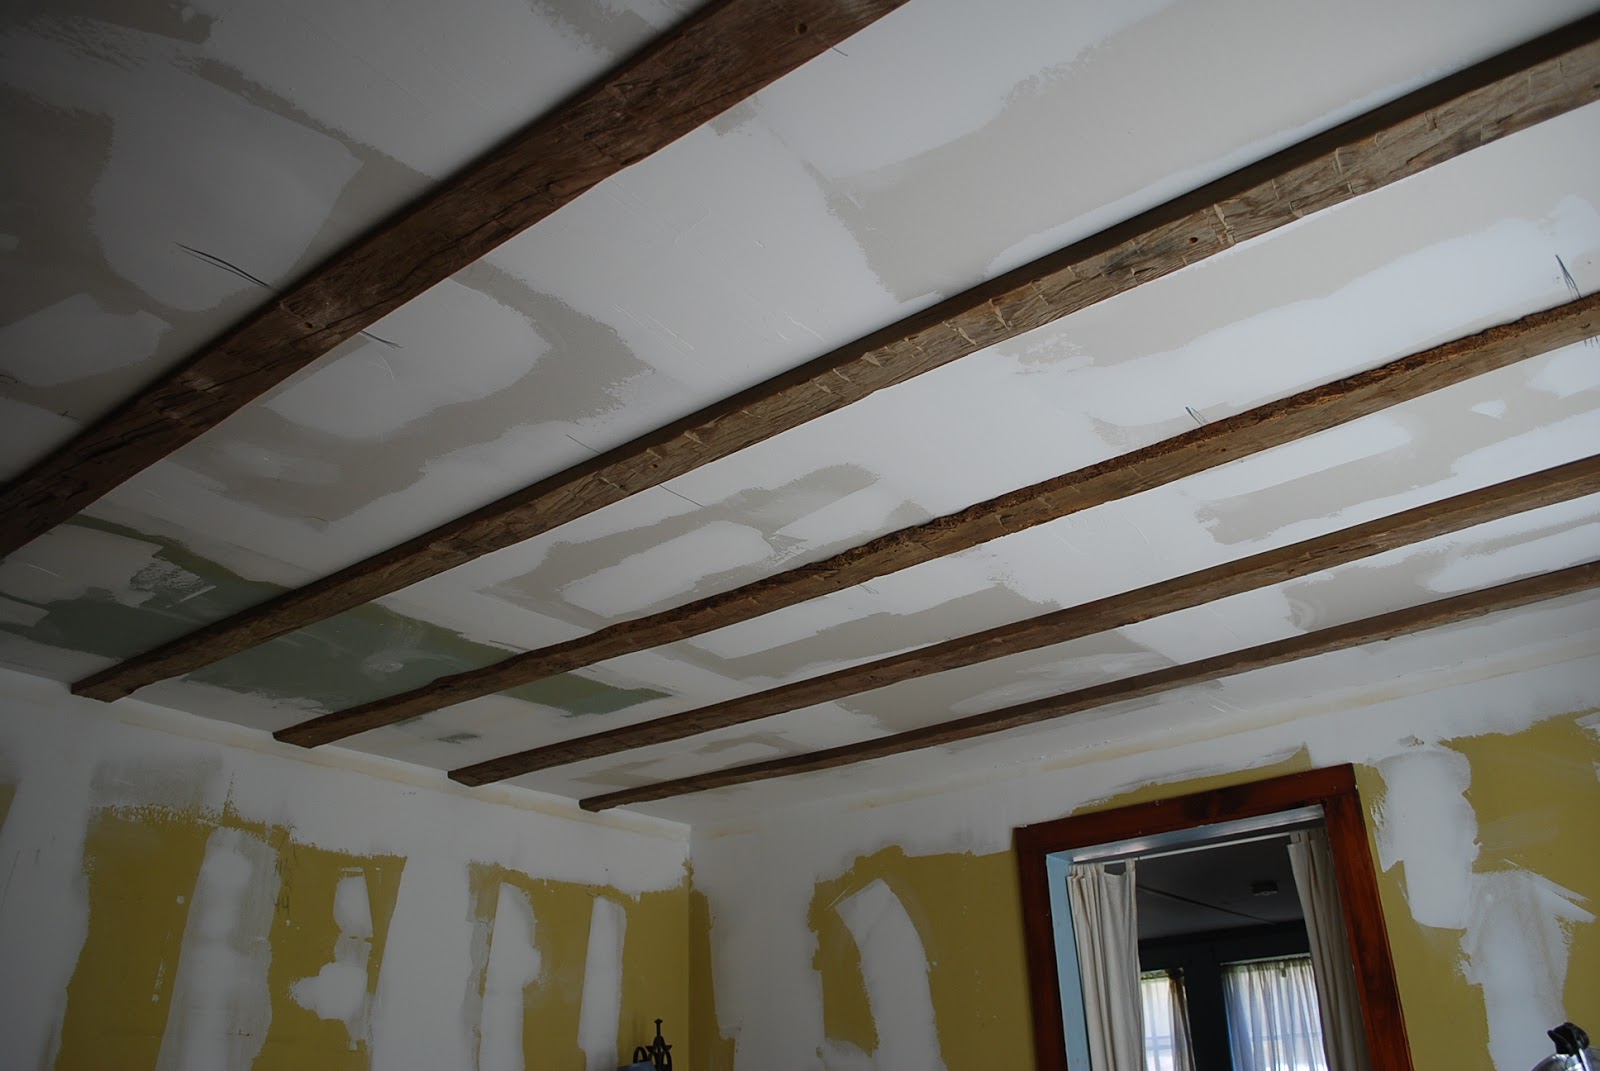
The insulation installed, I decided I wanted some exposed joists that mimicked protruding through the plaster. I had no plaster, but I had a bunch of hand-hewn cutoffs from a project at DCAM, where I mill timbers, and the company didn't want them. Good for me. I measured the room and decided to put the joists on two-foot centers; trouble was, I had nothing to nail to on half the joist runs. So I added some wood nailers between the other nailers. If you recall, I found that the real joists run from gable to gable as opposed to eave to eave as they do in most houses. But mine is timber-framed, so the rafters don't have to be attached to joists to keep the walls from spreading due to lateral stresses from the roof.
Paying attention? Good, because there's going to be a test at the end of the period. Half your year's grade depends on the result.
Anyway, I used the wood from the 1970's boxwork to install nailers for the sheet rock.


The false joist nailers are made of plywood.


The numbers refer to the distance of the joist nailers from the wall; once the sheet rock was installed, I'd need a reference.

One stupid mistake of which I was actually proud in one of my last posts. I removed a wire I thought only served the overhead light in the bedroom; I hate overhead lights. But this wire also served the oulets and closet light. so I had to patch it back in. note the huge hole in the right wall. I had to hew right through the end girt.

Sheet rock time! I rented a panel lift for the first time in my life. I'll NEVER do a ceiling without one again.

Complete. I felt like James Bond in "You Only Live Twice," where he has a mini helicopter supplied, of course, by Q. As I recall, he had to put that together as well.

Told you I'm a frugal Yankee.

The green sheet was also half off.


Damn, that was easy! Three hours later, the drywall is ready for floating.

I had to start rewiring the house somewhere, and this seemed like the best place to start. The ungrounded outlet on the left is superseded by the grounded one on the right. I removed the baseboard to make snaking the wire through the three hundred year old sill plate easier. It wasn't easy either way.

More outlets. Adding four more nearly doubled my house's capacity! Weird thing was that I knew I only had four circuits in my screw-in fuse box, but one of them wasn't being used at all. Maybe I shouldn't be surprised; old Polish farmers don't need much, and the house is only 900 square feet.

The original corner post. It turned out to be chestnut, not pine, and the white area is what once was bark.

I slightly stained it to match the pine of the fireplace wall. Note the numbers on the wall for the new joists.

Hewn, as you can see. Lath peeks out from behind it. The white stuff is ancient cambium, the living veins of all trees. Well, this one, at least.

The taping and floating begins. I had to do only a couple of rough floats; I would do a rough Colonial plaster finish, complete with ridges and discrepancies.

The rough float finished, I washed the walls and ceiling and made the joists into what I wanted them to be. They might be false, but they would look damn real. Here's a short description of how I did it.

As I wrote, I had a bevvy of hand-hewn hemlock from work; we needed the center sections and not the broadaxed sides. So when Brian Cooper (Hey Coop!) told me I could have the broadaxed edges, I took them home and stashed them for this very project.
The original wood pieces were twenty-foot long sleepers, logs hewn so that two sides were flat and the other two had the rounded edges of logs (called 'live' edges). Sleepers are thick pieces of wood upon which building frames or log houses are built, and they often rest directly on the ground. These particular sleepers were fifteen inches wide on the broadaxed sides and seven inches thick, and though they came from an 1803 barn, there was no rot or deterioration.
The sections I took home were thirteen to fifteen inches wide, and the joists I wanted to mimic were only to be four inches.
No problem, right?
Wrong. BIG problem.
The hewn sides were aged to a fine grayish-brow patina, and when I selected the most hewn-looking pieces and ripped them, I was left with raw, yellow edges of newly cut wood. This would show when I put them up on the ceiling. So I had to age the edges to make them look like the grayish-brown old patina.
I'll backtrack a bit here.
I wanted a look of joist bottoms protruding from the plaster as if the house had been built that way, and was sorely disappointed when the joists ran the opposite of what I wanted. Plus they were sawn, not hewn, and they were all of two inches wide instead of the four I wanted.
As I said, the house is not that authentic, so I'm not ruining a museum piece here. It's MY place, but I want it to look as old, colonial, and timber-framed as I can without being ridiculous. It might be a fine line between 1970s boxwork and what I was about to do, but I was willing to try it.
You be the judge after seeing the result.

A good example of the sawn edge of the hewn board. Note the yellow of the sawn edge; just to the right of the right sour cream container, the first part of the oxidizing solution has already been applied with the chip brush, darkening the wood slightly. I had to be very careful not to let the oxidizing solutions drip onto the hewn surface, otherwise it would darken that part, too. And that hewn face would darken naturally when I applied finish. The old broadaxe/adze marks are plainly visible here. I lightly sanded the hewn face to remove the roughness and even out the surface, but the patina remains.

So what exactly IS the oxidizing solution? A trade secret. But I'll let the cat out of the bag. The first solution applied is a VERY strong brew of black tea (right). The second is the real secret; put fine steel wool into white vinegar and allow it to steep for a couple of weeks in a glass jar with a METAL lid. It won't work otherwise. Then apply it as the first, CAREFULLY.
You won't see the result immediately, but overnight, the edges will turn gray. Sand them and they will look just like the face with the two hundred year old patina.

I also stressed the new edges in several ways. I used a jack plane to make them appear hand-worked, then used a machete to add more broadaxe/adze marks. These marks are the real thing; note the patina within. The oxidizing solution has just been added, and it would darken overnight.
This picture belies the actual appearance of the wood; it looks too dark on the edges, but that is a photographic effect of the light.


I had to make the ends fit to the walls as tightly as possible to mimic that they were real exposed joist bottoms, otherwise the entire faux effect would be a joke.
To install them, I used a T-bar made of 2x4s wedged under one end, while I positioned and attached the other end.
And how did I do this attachment?
I had to think a while on this. About thirty seconds, in fact.

A better pic of the oxidized edges. Plus a look at how I attached the pieces.
Note the dark circle to the left of the closest joist. That's the attachment point.
I marked where the joist nailers were (remember those?) on the sheet rock, then drilled a 1/2" hole part way through the wood using a Forstner bit at that spot after the wood was wedged in place. This bit drills an exceptionally clean hole with a flat bottom. I followed this with a 1/8" bit, then used a coarse-threaded screw to attach the false joist to the ceiling, behind which, a plywood nailer lay in wait. I was able to tighten the board to the ceiling with very few gaps this way. It also allowed the wood to warp to its own design, and not sit there perfectly straight. Real timber-framed joists are often twisted due to moisture loss as they cure in place.


The wood in the picture looks much darker than it is, but it did darken after an application of chestnut stain.
So how did I hide those screw holes?
I went into the shop, took a cutoff of the same piece that I'd installed on the ceiling, and used a plug cutting bit on my drill press to cut perfect plugs to fill those screw holes. As the plugs have the same patina as the hewn faces, they are nearly invisible after being glued in place.
I aligned the grain to match, of course. With some hypervigilance, they can be seen. But you gotta really TRY.

Before installing the joists, I had to rewrite the joist nailer numbers after the float. They tended to disappear behind the drywall mud.

Now things would get artistic. I needed to float the ceiling mud between the joists in thin enough layers to keep from cracking but still be easy to work without sanding. Two layers after the initial taping float, the mud is wadded up against the joists, and I needed to make it look like it had been there for a long time. I got up and physically knocked off the high points and globs, then did a last fill-in with more mud where holes and discrepancies existed. After all that, I washed the edges carefully with a wet rag, then washed them again with clean water to get rid of any white film left behind.

A mess!

Not so messy now, eh?

The far joist is clean, the left side of the near joist is clean. The remainder is yet to be cleaned. It was a LOT of work. Then I had to do a touch-float to fill in the little holes. This isn't Thomas's English Muffins, fer Chrissakes.

I decided to do a rough plaster finish, the details of which are a bit further on. But I also decided to do a type of paint finish I'd heard about years before, though it was somewhat brought on by circumstance. Good painters may often apply a deeper, darker color below, then a lighter tint of the same color as a second coat. This gives the finish a deeper base but a lighter top. It adds depth.
I wish I'd been so insightful. My yellow was a bit too yellow, so the second coat got a good dose of ceiling white added to it.

After the last coat, I cleaned the woodwork for the first time since moving in. The baseboard is curing in the shop at this time.

Even the floor cleaned up nicely.

Color is not so overwhelming now...

Speckle likes it.

I have a lot of antique longleaf pine, so I planed a few pieces and varnished them. Each piece took a different hue.


The one in the middle has a bolt hole, complete with iron oxide black staining. I would eventually use it and put a fake mouse emerging from it.

Baseboard installed. But, but, BUT!!!

The wood is straight, the floor is not. Some filling with an insulating material would have to be done, and I'd have to consider a quarter-round moulding to hide the gap. But my house HAS no quarter round!!!

Light finish in the corner shows where the triangular shelf with the TeeVee once stood before I moved in; mine is in the same place..

Apparently the wall is curved as well. Note the shadow behind the baseboard. I'll feel that this winter.

A detail of the ridges on the ceiling, which isn't really blue.


Finally moved in, thanks to a great deal of help from Sher. The yellow looks a bit more intense than it really is here.

Much has yet to be decorated; I have boxes and boxes of artwork upstairs. But I hate to violate the space with chachkies and gnick-gnacks, neither of which is spelled that way. That will happen eventually.

Speckie likes it.

She shows her appreciation to Sher by giving her some Face.
Note the stacks of stuff in the bedroom beyond; that room is now almost empty, and is waiting for paint and other accoutrement'.
The big project for the coming snow months is the kitchen. I can't be out of there for a year. I've got the shop ready to make the counters, and it will receive the same ceiling treatment as the living room.
I'll post what the Grounds look like very soon; you'll shit.
You really will.
Then there's the barn....