LIVING ROOM CEILING, FIRST PHASE
Yeah, I know I tole you to keep close as I dissected the living room ceiling, and that I'd have the next post up in a jiffy.
We have this thing up here called Winter, and if you thought the snippet of a post about last year's Winter was overblown, you ain't seen this winter. Oh, you saw the last post, where we had three feet two Mondays ago (actually between two and three), but then we had another foot last Monday, topped with a half an inch of ice. All these storms seem to come on Monday, which screws up my work week very nicely, thank you very much. It's Sunday night, and we're supposed to get six more. The radar might be my friend this time; it looks to be passing to the north. I just yesterday shoveled my way to the barn, and did my third shoveling to the shop at the same time.
Others of less energy would say that was enough, but ME? HA! I'm a true glutton for punishment. Chomp chomp.
I started my living room ceiling project a month ago, just before the snow dropped its first twenty seven inches. Good timing. It was also a month ago I got as sick as I've been in many years. Throat tickles turned to congestion, then coughs. The shit settled in my chest, and I took all my vacation in a prone position. I've had the p-nu-moan six times, and this was similar. I've still got a good deal of crap in my chest and throat a month later, but despite this, I have been both at work and working on the living room. Work now consists of framing a huge addition to the Pendleton-Chapman House in Avondale RI, so I get to work outdoors in the sea-whipped air on the Atlantic Coast while I cough.
Splendiferous.
In the meantime, I HAVE been working on the Living Room Ceiling Project.
As you will see as you read on.

This is why I moved the operation inside. The barn will have to wait until the snow melts. Likely June, with this load. And that doesn't take the next, next, and next into account.

I hate the color of this room, which is a bit exaggerated here. Babyshit yellow. The two false beams and ceiling/wall boxwork can be seen here, likely added in the sixties or seventies. The wood is knotty pine.

The fireplace is likely early 1700s, the woodwork much later, likely 1960s or 70s. Still very nice, well milled, and installed by someone that knew what they were doing. It might very well be cedar; the knots seem a bit too big and the grain too wavy to be white pine. I don't know yet. The right planks are over twenty inches wide. All the woodwork that surrounds both fireplaces is similar, and looks to be based on a small bit of ancient paneling in the back room, the oldest in the house. The door to the left is very old, likely early 1700s. The fireplace is also early 1700s, but the cast iron surround is much later, prolly late 1800s. I have no intention of removing it or opening the hearth for future fires; I intend to install a small wood stove here. Note the steel flue insert. It used to vent a huge kerosene heater (go back to the first post or two to see it). The curve in the floor is no photographic anomaly; the stack has sunk a bit since its constructon.

The west wall and its boxwork. Tools and sawhorses waiting to be set up. I moved the entire living room contents into the bedroom (very spacious it is, he said in his best Yoda voice), and have not been sorry. Heating this house is difficult on the slightest cold day, and the temps have been especially low this winter.

The East Wall. Note the disparity in the width of the window trim and the stool, seen at the lower right corner of the windows. I'm not sure what I'm going to do about this. The wood is pine, and has been woodgrained. Badly. I will replace it, considering that I have stacks of 400 year old southern yellow pine in the yard. I'm not sure what dimensions I will mill into the new trim. I KNOW that's not authentic, but very little of this house is authentic other than its framing. At this point in the project, I knew a few things, such as the fact that the joists run the wrong way, from gable end to gable end as opposed to eave to eave. This is not unusual for a timber framed structure of this age; the ceiling joists would normally keep the walls from moving due to roof rafters pushing outward, but the plates and sills are hewn and pegged. If it hasn't moved in 325 years, I'm not worried that it might in the future.

A better view of the fireplace and its natural tilt. Hard to see here is the second floor under the 1x4 (actually 3/4" by 3") yellow pine floor, the latter likely installed in the late 1800s when heart pine was cheap and modernizing Colonial structures was the norm. If I was lucky (and if my first observations were right), it might be wide chestnut. If so, I'd expose it after I finished the ceiling and rewiring. Read further to see it from beneath, where other architectural treasures will be uncovered. The heater came with me from Arkansas, and though it looks pretty, it is highly inefficient and will not be used again in this room.

This bit of 1960/1970s fluff has bothered me since I first saw the house in 2012. This is the corner of the house, installed when it was expanded from a one-room end-chimney design to the full Cape (two-room with a long room at the rear with a central chimney) in the early 1700s. But the wood is the same age as the rest of the boxwork on the ceiling. What might live behind it? If I was lucky, a little excavation might uncover a gunstock corner post (go back to the Harvard Carriage House in Architectural Vestiges to see one). If not, whatever I'd find would likely be more authentic than the trim that surrounds it.

Yes, whatever lives behind it can be revealed with a little careful flatbar work...
But, but, BUT!!!
Since I'd first seen the house (and much more since I'd been working in the room with no furniture), I noticed that the floor bounced like a rubber trampoline. I knew that many of the floor joists have ancient pine beetle infestations. Plus they are three hundred years old. Sighing as I looked out at the newfallen three feet of snow on the ground (okay it was twenty seven inches, grrrrr), I gathered my equipment, shoveled my way out to the cellar bulkhead doors, and went down to do battle with floor.
Maybe I'd learn something about the house's history.
Even though I'd examined the cellar before I even considered making an offer on the house, I didn't really KNOW it from down there.
.JPG)
I'd already put five clip lights into place when I'd run new gas lines last winter, and now I brought my second sawhorses and some lumber to reinforce what I already knew was a worm-farm. Surprisingly, the joists, though worm-eaten, still had plenty of solid wood into which I could screw my secondary supports. Later I'll remove them and run newer, longer ones to the sills that sit on the brick foundation walls. These brick walls are locally made brick laid upon schist foundation stones, first set up in the early eighteenth century when the original one-room house was lifted, the cellar dug, and the central chimney built. Then the room to the north (the living room I'm restoring) was built, along with a couple of small rooms to the west. This became most of the present house, reportedly around the first ten years of the eighteenth century.
.JPG)
Temporary support to strengthen the floor I'd be working off above. I'd add another to the east (right).

A FIND!!! While Looking around with my flashlight, I saw a shiny bauble in the stones of the central chimney stack, and removing it, I had to laugh. I am a consummate treasure hunter (a reformed archaeologist, actually), and, using my metal detector, I once found the top tin (though it's actually made of aluminum) of this very item. I brought it to my all-knowing mother, who laffed and laffed.
"Merry widows! I haven't heard that term in years!" It turns out that this was the generic name for rubbers (a prophylactic device worn by men to negate the possibility of pregnancy in the women with which they were having sexual relations). Apparently keeping the tin in the cellar, stuffed among the chimney stones, was the preferred placement for such an item at the time. I need to approach the siblings of the Matriarch of the Farm to inquire about this, but my guess is that this item predates the last family by at least fifty years.
A good shake of the tin reveals that at least one still resides there. I don't believe I'll use it.

The sills and plates are hewn in both the cellar as well as the living room, while the ceiling joists are sawn. The floor joists, however, are also hewn. The plates and sills are a mix of chestnut and white pine.

The sleepers (the boards between the floorboards, which are flat sawn and not tongue-in-groove) are chestnut. To my delight, so are the wide boards above. These are below the heart pine floor in the living room. As much as I dread another project, the prospect of a random-width chestnut floor totally lights my fire. It will be uncovered and refinished after the ceiling and walls, though.
.JPG)
The living room floor reinforced from below. Enough to do the restoration, anyway.

The central chimney stack from the cellar. Note the squared timbers used as filler within, especially the group above and the one directly below those. I'm guessing that these are the first house's roof rafters, removed when it went from a one-room to a two-room house. Note the tenon and trunnel-hole of the timber directly below the big stack that supports the floor around the hearth.

I'm not sure what the filled-in area is in the north foundation, but it was done rather haphazardly. I guess this was a coal-chute, but only a long talk with the elder Sibling will tell.

One of the original joists below the kitchen, the 1690 portion of the house. Rounded except for the hewn side that supports the floor, it matches other of its kind in the same area. Worm food, but surprisingly strong.

A newer sill that has been collapsing due to cellar moisture.

Chimney stack with older timbers with mortises, all hewn chestnut. The water bottles are a precaution for those of us that have wells and might have ice take out power any time in the winter. Doesn't happen often. In Arkansas, the power was much more likely to go out, what with the tornadoes and ice storms. The cellar never freezes. Never has in three hundred twenty five years. Good old earth; one hell of an insulator.

The only really new wood in the cellar. The termites have had fun with it. The older wood has pine beetles in places, but no termites. Let's hear it for old wood. I intend to treat everything in the cellar with Boracare this spring.

BACK UP TOP!! Now for whatever lay under the half-inch thick pine. Damn! It was simply a painted four by four, and a new one at that. Most of this phase was done at night; my day job pays for this shit. The 4x4 ran up into the ceiling, so I'd have to remove the ceiling to see the thing in its entirety.
The ceiling joists that run the wrong way. The white lines are lime from the plaster ceiling, the first evidence of what was there before. The joists are sawn, the plate is hewn pine with some bark still on it. Note the broadaxe marks. Now here was a dilemma; the black spots are from nails that held up the wood lath strips, long gone. But those nails that remained were machine-made, not handmade. The lath strips were also machine-made, if the preternaturally exact widths are to be taken as evidence.
Now, machine-made nails are not rare around 1700, and split lath (as opposed to sawn lath) was for the Provinces. Connecticut had many small mills making everything the growing population might need. The Nutmeg State is famous for its enterprising, business-oriented populace (still is), and small mills were built on every stream with enough fall to power a wheel (we have a plethora of these as well, and old mill foundations can be found in just about any valley). But I was a bit disappointed to see that my own house's 1700s addition was so...modern. I have to admit that the name of my road IS Miller Road, though. The white lime that made the plaster likely came from crushed oyster shells, a by-product of other enterprising Connectikittens down the coast, twelve miles away.
Tole you we are enterprising bastards. There's not a speck of limestone in the state, which is the normal source for slaked lime for plaster. Gotta get it somewhere.

The sleepers that support the second floor floorboards are chestnut, but the flooring appears to be pine. I saw the pine floor from the "attic" when I first examined the house. The difference between chestnut and pine can be easily seen here. Chestnut has large knots, flecks of grain as opposed to long figure lines, and is much harder despite being equally as light. It resists decay and termites, works easily, and takes a brilliant finish. Or it used to before the Chestnut Blight killed all the trees.

The sawn joists are white pine, and not only sport tenons fitted into mortises in the hewn plates, but many are also custom-worked to match the curvature of the plate. The piece of wood with the geometrical pattern attached to the plate is a piece of deadwood installed to carry the edge of the lath. This joist, like several others, seems to have moved out from its original position.

With enough of the ceiling removed to examine the 4x4 in the corner, I decide to take a closer look.

Ah-HA! It's not a 4x4 at all, but a couple pieces of 3/4" trim boxed around an old corner post (seen above the joint of the stained boxwork and the white trim around the post). It also has a trunnel through it as well as a few broadaxe marks. Hot diggity damn! But it does not look to be of 'gunstock' design.

Not a very good picture of the exposed post.

The post sports some rather enthusiastic broadaxe strokes, along with a generous piece of pine bark. The bark is ready to fall off, though I'd like to keep it. I will clean, lightly sand, and preserve this post. The others are in the bathroom (very difficult to expose, but I will try when I remodel that room), in the laundry room (already exposed it and half of it is gone to termites/water damage), and in the kitchen, behind the shelving above the sink. Prolly leave that one hidden. The lath on the walls was apparently left in place after the plaster was removed and the drywall installed; look to the right of the post.

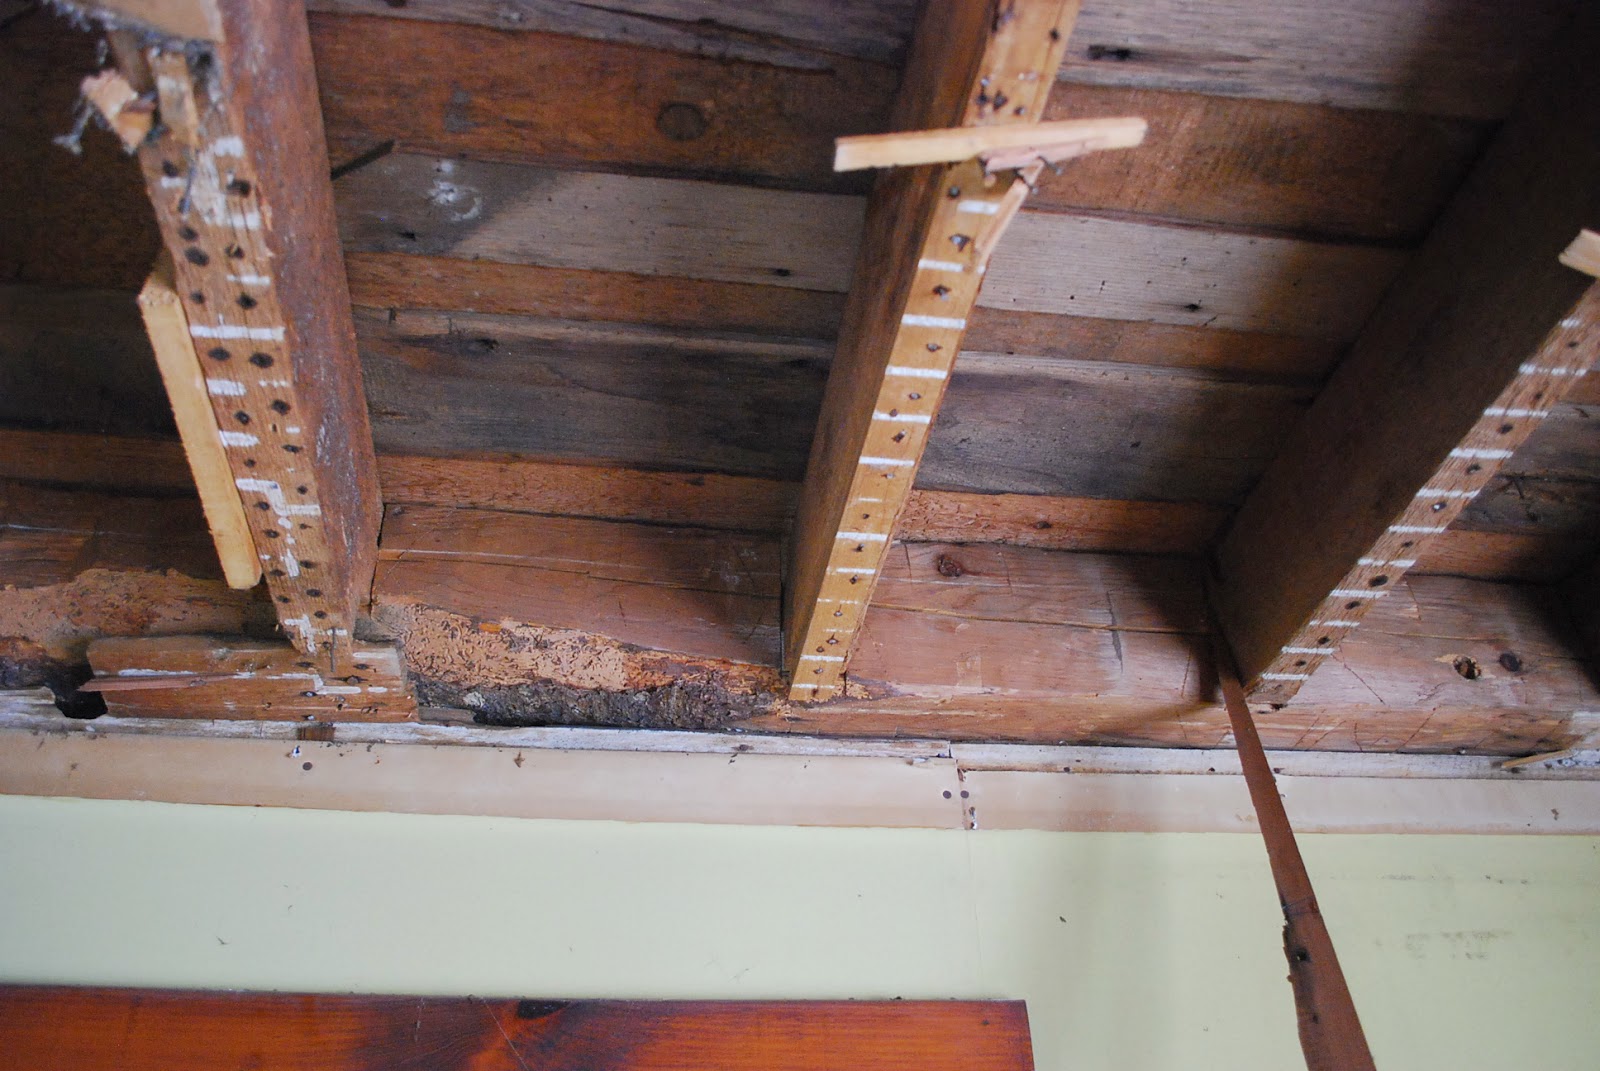
Egads! The floorboards apparently end two to three inches from the eave plate! The day I tore out this section of the ceiling was seven degrees, and icy air began to cascade into the room. More interestingly, the diagonal corner brace that can be seen behind the piece of pine with the circular grain on the right side is ABOVE the floorboards. Examination of the plate in the attic showed that it is much higher than the ceiling or flooring of the second story.
Needles to say, the house got VERY cold that night (seven below outside, and I had no insulation to shove into the holes I exposed).

The next day, trying to keep warm, I removed the remaining ceiling. The hewn south plate was, surprisingly, hewn chestnut. The north plate is pine.

The ceiling exposed, and the boxwork remains. The wiring isn't dangerous, but is not something to keep. I will work around it and preserve it until I ditch it entirely. All my new wiring will go through the cellar, attached to the ceiling. Safer that way, and I have no ceiling fixtures in my future.

The south joists and their tenons, showing past movement as the west part of the house (further away in the picture) has journeyed further to the south than the east side. The chimney stack, behind the paneling, is likely to blame. The nailers for the old drywall were clear heart redwood. Go figure.

Tight tenon, east side.

Not so tight tenon, heading west. The curve at the bottom was gnawed by a rat, not carved before installation.

Furthest west joist tenon, only 3/4" of it still inside the mortise. I would add wood brackets to this one before finishing the insulation of the ceiling. Note the horizontal crack. I'd gotten there just in time. Or this crack was there in 1702. Who knows?

This is not my idea of good electrical wiring, and it shouldn't be yours, either.

I finally stuffed temporary insulation into the cold-spewing holes, which helped a bit.

"Modern" wiring attached to older wiring. This connection was cut and sealed, as it fed a ceiling light I never use in the bedroom. It also fed one of my two receptacles (I have ten in the entire house). Tine to run a new circuit!

It took three hours to remove the boxwork. The carpenter apparently liked to use lots of nails. Then five hours to run the R-19. This room is now much, MUCH warmer. It smells like insulation, though.
This was a lot of work. Next is running a lot of new nailers to match the one left in the middle of the room, then to put up new drywall. I'll reuse the denailed 1x from the boxwork for this (a Damn Frugal Yankee I have become). Ah, but then I have a surprise!
Granted, it will have to get a bit warmer before I can show you what I'm going to do to this room, as three feet of snow is atop the pile of lumber involved. I may work in the basement after I do the drywall, which, even considering the taping and floating, is perty damn boring and not really worth a big old post like this one.
SO.
YIPPIE TIE ONE ON!!!
SPRING IS AROUND THE CORNER!!!!
We did have four more inches of snow today, and five more is expected Thursday, with another five on Saturday.
So don't lissen to me. I'm snowbound and winter-crazed.
Jesus, this shit is worse than last year, which, if you remember, was the worst winter in New England in fifty years. THAT lasted forever, but it wasn't as deep. As deep as it is out there, this will likely last longer.
At least this room will be a bit warmer. It is, after all, the first room in The Standish House to have received any real insulation.
More will follow.